Pin It Hover Widget

Thursday, October 24, 2013

Karen's Burlap Bags

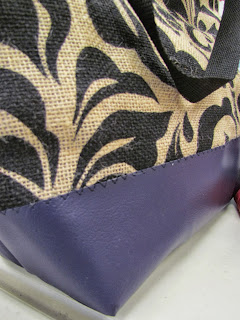
We want to thank Karen for being generous and sharing how she made these wonderful burlap and vinyl bags! How cute are they? She was creative in taking something so fun and popular and making it practical and long lasting by pairing it with vinyl at the bottom! No need to worry about your burlap soaking up water or other debris while your bag is placed on the floor.

Bag and Tutorial Copyright 2013 Karen Wooten
What you'll need:

Vinyl -- 1/3 yard
Burlap -- 1/2 yard (we sell the cute printed burlap pictured above!)
Strapping -- 1 1/3 yards
Lining -- 1/2 yard

Cutting Instructions (these cutting instructions are to make the purple bag above; these instructions can be played with to create different sizes):

Cut 1 burlap to 18" x 28"
Cut 1 vinyl to 10" x 18"
Cut 2 vinyl to 3" x 18"
Cut 2 straps to 60" lengths
Cut lining to 18" x 28" plus any pockets you would like to add inside.

Assembly Instructions:

Place the vinyl in the center of the burlap as pictured below. They should both be right sides up.


Stitch along the edge of the vinyl using a zig zag stitch. The foot will stick to the vinyl so cover it will tissue paper or wax paper to be removed after stitching. 


Match the side seams right sides together; make sure the top of the vinyl matches at the side seams. Sew both side seams. Match the side seam to the center bottom and mark a straight line across the triangle however deep you want your bag to be. Sew along this line as shown below. 


Sew the lining the same way and add any pockets you would like. Insert the lining into the bag, wrong sides together. Sew the two pieces of 3" x 18" vinyl together on the short ends, right sides together. This will act like binding for the top of the bag. Place this right sides together along the top edge of the bag, including lining. Sew to bag with 1/2" seam allowance going through all layers. Turn up the binding and fold to the inside of the bag. Stitch along edge of vinyl binding on the outside of the bag using a zig zag or other decorative stitch in order to catch the inside bottom edge as well.


Add your handles and any other embellishments and enjoy! 


*All Fabric Center tutorials and patterns are for personal use only and are not to be made to sell!! 

Maquel's Chenille Baby Blanket

Maquel did such an amazing job on this chenille baby blanket and chose such cute fabrics and colors that we had to share it with you!


What you'll need:

5 pieces of flannel -- 36" x 36"
4 1/2" yards of ric rac 
1/3 yard flannel for binding

Instructions: 

Layer the 5 layers with the main fabric face down and four face up. Mark the top piece with a line from corner to corner and mark the rest of the blanket top with with lines 1/4" to 1/2" apart. OR you may use  guide to sew in the rest of the lines if you would rather not mark all the lines.

 
Make sure to pin all the layers very well; the layers should not twist or move as you sew (505 temporary spray adhesive between the layers works well and this particular brand does not clog or gum up your machine. We carry 505 in store).  Sew all the lines through all layers. After they are all sewn, cut between the lines to create the chenille look. Be extremely careful not to cut through all layers!! You only want to cut the top three layers leaving the bottom and second to bottom layers intact. 


Olfa makes a special rotary cutter designed specifically for chenille blanket. There is a tray underneath the blade. Putting the tray underneath the 3rd and 4th layers will help you cut just the top 3 layers while also protecting the bottom two from being cut. Not only does it save time but also your scissors and your hands. We carry this special cutter in store. 

Now square your quilt and sew ric rac around the edges of the blanket, centering the middle of the ric rac directly over the seam allowance. This creates the effect of scallops as the binding will cover the other half of the ric rac, only exposing one half of it. Bind the quilt as usual and you are finished! 


*All Fabric Center tutorials and patterns are for personal use only and are not to be made to sell!

Janet's Plastic Bag Holder Tutorial

We love our Janet for all her energy and sewing creativity. She was happy to share her tutorial for making a hanging baggie for keeping and recycling plastic bags. You will need:

19" x 19" square for the main body
1/2" elastic -- (10") for bottom
                      (12") for top
1/2" wide ribbon -- 9" (or sew your own skinny fabric strap)

Plastic Bag Holder and tutorial Copyright 2013 Janet Howard
Bag pictured here is a fancy version that builds from the simple version. Scroll down for Fancy version instructions.

Place hanging strap (or ribbon folded into a loop) 2" from the top and angle upward so it will hang right. Be sure to have the strap inside when you sew. Fold 19" square, right sides together, and sew side seam with 1/2" wide seam. 


Form a 3/4" casing on top and bottom with a small opening in both. Thread elastic through opening, seam ends of elastic together and close the small openings. Viola! You are done. 


To make the fancier version, you will need:

16" x 19" rectangle for main body
4" x 19" rectangle for bottom section
3 1/2" x 30" rectangle for a ruffle
1/2" elastic -- (10") for bottom
                      (12") for top
1/2" wide ribbon -- 9" (or make your own skinny fabric strap)

Make your ruffle first by hemming the short ends. Fold in half matching long sides, gather to match to match the bottom of the 16" x 19" rectangle and pin. 


Place bottom 4" x 19" section on top of ruffle and main body, right side down, and stitch through all layers with a 1/2" wide seam. Continue in the same manner as the regular bag: fold the whole piece (which now contains the main body on top, the ruffle, then the bottom piece) lengthwise right sides together and sew with a 1/2" wide seam. Make a 3/4" casing on top and bottom, leaving an opening. Thread elastic through casings, seam ends of elastic and close openings. 


There you have it, make one for every season to hang in the kitchen or make them to give as gifts this holiday season! 

*All Fabric Center tutorials and patterns are for personal use only and may not be made to sell! 

Wednesday, October 23, 2013

Katie's Floral Bracelet/Corsage

We have a wonderful little project by Katie perfect for a special occasion like prom or sweetheart's. This is a lace bracelet made with fabric flowers to be worn as a corsage or simply a sweet bracelet for a night out on the town.

Bracelet design and tutorial Copyright 2013 Katie Sanchez

What you'll need:

1/2 yard stretch lace
1/4 yard lining or other synthetic fabric
Felt scraps
1 decorative button
Hot glue gun and hot glue gun sticks

Instructions:

Measure around wrist and add 1" for seam allowance. Cut this measurement from the stretch lace. Join ends of lace and make a 1/2" seam; this can be done with glue or on the sewing machine using a stretch stitch. Make 3 flowers, 1 large and 2 small, from the lining fabric using your favorite burnt end method. There are countless tutorials out there that show how to make dozens of different kinds of fabric flowers. Pick your favorite and then play with your creativity and imagination to make your flowers unique: use different colors of fabric for one flower or include different kinds of material like tulle or netting to make it a mixed media flower. We have picked a handful of our favorites and posted them on our Pinterest page on our "Fun Projects" Board. Scour the internet and find the method that will give you the look you are after. 

Once you've made your fabric flowers, cut three small circles from the felt to use as a backing for the flowers. Hot glue a flower to a felt circle, trapping the lace in between. 


Center the large flower in the middle with a small flower on each side. Glue your large flower over the seam in the lace to give your bracelet a seamless appearance.  


To finish, embellish the bracelet with a button, jewels, gems or other decoration by hot gluing it/them in the center of the large flower. 


There you have it, a corsage to match your beautiful dress that will last a lifetime! 


*All Fabric Center tutorials and patterns are for personal use only and may not be made to sell!! 

Lara's Halloween Wreath

Our first tutorial that we will feature on the blog for Shop Hop is another fun and easy project by Lara Phillips!

You will need:

(1) 4 ring metal wreath form
(1) spool of 6" wide tulle -- orange
(2) spools of 6" wide tulle -- purple
(1) spool of 6" wide tulle -- green
(1) spool of 6" wide tulle -- black
Spiders and decorations

Wreath design and tutorial Copyright 2013 Lara Phillips
Cut tulle into 6" lengths. Fold in half and place under the wire. Pull the tulle ends through the loop created by folding it in half and tighten onto the wire making a round knot.

This image is borrowed from A & B over at Pitlandia from pitlandia.blogspot.com to give you an up close look at how to create the knot with the tulle onto the wire frame. 


Continue until the wreath form is full. The inside ring is orange, 2nd row is black, the 3rd is green and the outside row is purple. Attach a couple of 24" pieces of tulle at the top in the same manner to create a hanger and tie into a bow at the top. To finish off, glue spiders and other decorations as you choose. You now have a fun decoration to hang on your door to greet those little ghouls and goblins Halloween night!

*All Fabric Center tutorials and patterns are for personal use only and are not to be made to sell!! 

We're Having a Pinterest Party!

Shop Hop has officially begun this morning, did you guess our celebration theme? We are having a Pinterest Party at Fabric Center from now until this Saturday! Come help us celebrate our favorite social media app be getting inspired by projects, patterns, quilts and lots of fabric. We will be featuring projects created by our talented employees with free tutorials and projects available in store as well as here on the blog. We are also really excited about our quilt designed and created by our beloved Peggy McDonald. Do you recognize what it looks like?

Quilt Copyright 2013 Peggy McDonald
Yes, it's a giant Pinterest profile complete with individual boards! What is so fun about this quilt is each employee created each of the 12 individual blocks with a theme they love. Not only is this quilt cute and colorful, but is incredibly heartfelt and special to the entire staff of Fabric Center.

By Lara Phillips

By Peggy McDonald

By Tammy Nelson

By Cheryl Edmunds
By Katie Sanchez

By Marilyn Clark

By Maquel Querry

By Janet Howard

By Karen Wooten

By Debby Libby

By Orva Nelson

By Deb Graber

The pattern is available for free in store during Shop Hop. Make sure when you create your own Pinterest Quilt that you choose 12 themes you love, use creativity and imagination to make each block unique: play around with embroidery, cross stitch, 3D quilting, crafting, and printing on fabric. Yes, you can print on fabric! Tips and tricks for printing on fabric are included in the pattern in order to get your board title pieces. 

Make sure to check back with us these next few days as we will be sharing tutorials on our Pinterest Projects featured in store created by our wonderful employees! 

For more information about the Beehive Shop Hop, to print off a map and to see which other stores are participating, follow the link to the Shop Hop's website and blog. Don't forget, at each store you will receive a free 12" block and quilt pattern, play games as well as the opportunity to enter a drawing to win prizes. Each participating store will have their own specials and sales being offered. We will be continuing our Anniversary Sale during Shop Hop with everything in the store on sale or discounted. We look forward to seeing you this weekend! 


Thursday, October 17, 2013

Featured New Teacher and Shop Hop Hint

We have been working with a new class organizer, Susan Hayward, who has lined up some wonderful new teachers for us. We are looking forward to all the new classes and ideas these wonderful ladies will be bringing to our store and customers. Make sure to keep checking back as we update you on our new QuiltSmart Club and Pincushion Club! We are featuring Carmen Geddes as our Premiere Teacher for November!
Carmen Geddes brings her love of quilting, embroidery, and people together for a fun day of learning. Students enjoy her friendly, low-key approach and her great techniques! She was named Teacher of the Year at HMQS 2013. She has taught at many quilt shows around the country and specializes in quilt retreats. She resides in Eagle Mountain, Utah with her husband Patrick. They have five children and eight wonderful grandkids!


Carmen's first class with Fabric Center will be a Machine Applique class! Enjoy beautiful, instant success in applique that will look hand done! If you have been overwhelmed by an applique project, or have always wanted to try but were not quite sure about the handwork, then this class is for you! In this class you will create an 18" block. You will be so hooked on this technique you will want to make enough for an entire quilt! The class will take place November 2nd from 10 am to 2 pm and costs $25. Needless to say this is a wonderful opportunity! 

Finally, don't forget that next week is the fall Beehive Shop Hop! As detailed before, the theme this year is celebration with each participating store specializing in a different party theme. We have decided to keep our theme secret until the first day of Shop Hop, October 23rd. However, we are so excited about our unique and cleaver party theme that we can't help but divulge a few hints:

  • It is based off one of our most favorite social media tools designed to spread creativity and inspiration.
  • We just started our own profile for you to follow us on this social media outlet here
  • This kind of party is a fairly new invention where you and your friends create things to be enjoyed at the party or to "make and take" home while in the comfort of your host's/hostess's home.  

Did those hints help? If you've guessed it or not, we would love to see you come celebrate inspiration and creativity with us next week from the 23rd to the 26th. We will be carrying our 30th Anniversary sale through into Shop Hop so everything in store remains on sale! We look forward to seeing you. 

Thursday, October 10, 2013

Tutorial: Cuddly Snake

We have truly talented and creative employees here at Fabric Center. This week, we had our lovely Lara Phillips share with us her own pattern for making this cute stuffed snake made from our favorite fabric: cuddle!


You will need to download this pdf file with the pattern. You must have Adobe reader in order to view the file, which you can download for free from Adobe here. There are 7 pages that you will need to print out. Make sure that when you print it, select from the printing preferences so that the file will fit an 8 1/2" x 11" paper completely. On your printer, this may be "Print at 100%" or "Print to Fit Page"; check your printer's manual or do a test page to see which gets the desired result. 

You will also need:
  • 1/4 yard of cuddle fabric (or any other 60" wide soft fabric) for the top of the snake
  • 1/4 yard of cuddle fabric (or any other 60" wide soft fabric) for the bottom of the snake
  • Thread
  • Scrap of felt
  • Buttons, stuffed animal craft eyes, or anything else you'd like to use for the eyes
  • Polyester craft filling
  • Micro beads filling (optional)


Once you've printed your pages, line them up on order from 1 to 7. In the original pattern, diamonds had been made on each side of each page to help line up the snake, but these diamonds did not transfer well into the scanned document, so please ignore the triangle seen on the left side of the pages. Line up the pages matching the snake lines and tape the pages together. The snake is meant to narrow and curve upward as you go do the tail. 

Once you've got your pages attached, cut out the snake shape and you've got your pattern! Lay out your pattern on your top fabric with the right side of the fabric facing down and cut out. Lay out your pattern on the bottom fabric with right side of the fabric facing up and cut out. Cut out a from your scrap of felt a tongue shape. If you are using craft eyes or buttons for the eyes, now would be a good time to attach your eyes on your top fabric. Make sure to space the eyes are good distance away from your salvage edges so as not to get in the way while sewing your snake up. 

Once you have your eyes attached, pin your top and bottom pieces right sides together, leaving an 8"-10" opening on one side of the snake. Sew around using 1/2" seam allowance. *TIPS ON SEWING WITH CUDDLE: if you have a walking foot or even feed function on your machine, now is the perfect time to use it! Cuddle has the tendency to stretch or shift while sewing. By taking the pressure from the pressure foot off the top piece, you reduce the likelihood of this happening. If you do not have a walking foot or even feed function, use lots and lots of pins (one pin about every 1/2"-1") and take it slow. About ever foot or two, sink you needle into your fabric, raise your pressure foot and readjust your fabric and allow it to relax back into place. Then return your pressure foot down and continue sewing.

Once you have sewn all the way back to the opening, finish off your seam and start stuffing your snake. Lara added micro bead filling to the head and tail of her snake to give it some weight, but this is completely optional. Stuff evenly, avoiding lumps then close up your stuffing seam using an invisible hand stitch, AKA: ladder stitch. Here is a lovely and easy photo tutorial to show you how. 


Voila! You now have a cuddly and warm snake buddy for you or a loved one to play with. Big thanks to Lara for her wonderful, fun pattern! If you have any questions or need more clarification, don't hesitate to send us a comment or better yet, stop in the store for some one-on-one help! 

*This pattern is copyrighted 2013 by Lara Phillips on behalf of Fabric Center. All Fabric Center patterns and tutorials are for personal use only and are not to be made to sell! 


Wednesday, October 2, 2013

Time to Celebrate!

We are so excited to be celebrating our 30th Anniversary this month! In 1984, Ken and Joan Cahoon set up a tiny fabric shop in a strip mall just off 90th South where they featured flatfold cottons and assorted trims. It was a small family run operation with their children helping out on the floor. They moved here and there occasionally throughout West Jordan until they were finally able to find a building they could own and would allow them to grow their inventory. It's been 30 years, and now Ken and Joan's daughter and son-in-law, Lisa and Jon, are proud to carry on Fabric Center's tradition of offering the best customer service and a large, varied selection all at reasonable and competitive prices.  We decided to bring this milestone in with a bang: we launched our newly redesigned website as well as opened an online shop on Etsy! All our customers, especially those out of state, can now shop from us online and order hemstitch burps and blankets here. Depending on how we do with online sales, we may increase our online listings to tricot, baby panels, and more.


Additionally, we have started our 30th Anniversary sale! Everything in store is on sale, big time! Come in sooner rather than later to pick up what you need for Halloween, Christmas or even just a fun shopping spree. This sale will be going all month long, but don't expect to see what you love stay on the shelves for long. With a sale this big, things are gonna be flying outta here!